You can download the AEP with Newton2’s settings (CS6 and above) here.
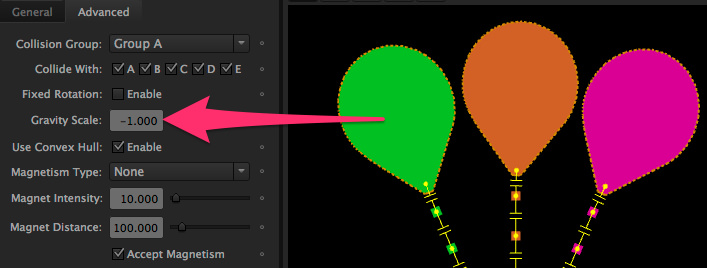
In this example, I wanted to illustrate the Gravity Scale feature in Newton2, and how we can use it to simulate flying balloons that interact with their environment.
Gravity Scale allows you to set a custom gravity per body.
I’ve used Connect Layers to represent the ropes attached to the balloons.
There’s no “Flying in the air” option in Newton, but you can somehow make objects fly if you use a negative Gravity Scale value!
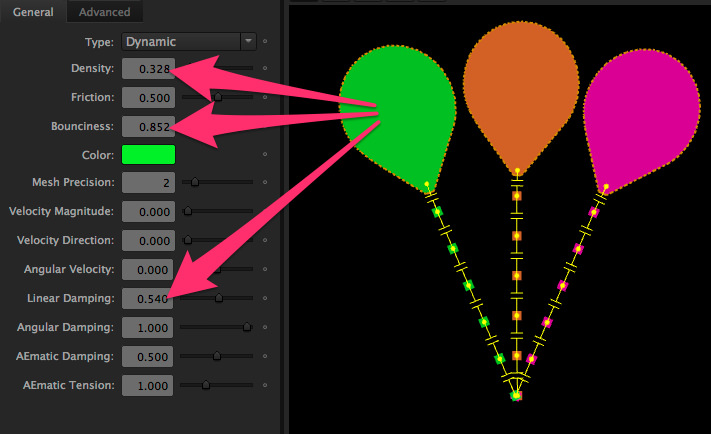
You need to tweak some parameters to make it look correct: for instance, balloons have lower density and higher bounciness coefficient. I’ve also increased the Linear Damping value to fake air resistance.
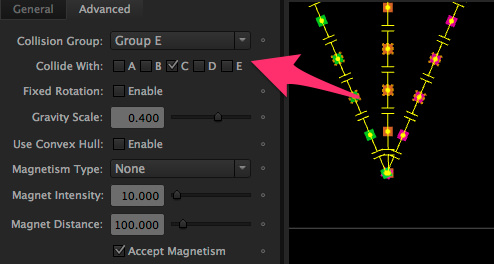
To add a sense of depth in the animation, I’ve used the Collision Group feature: the pink and green balloons collide with each other, but ignore the orange balloon. The little squares that simulate the ropes can only collide with the walls.
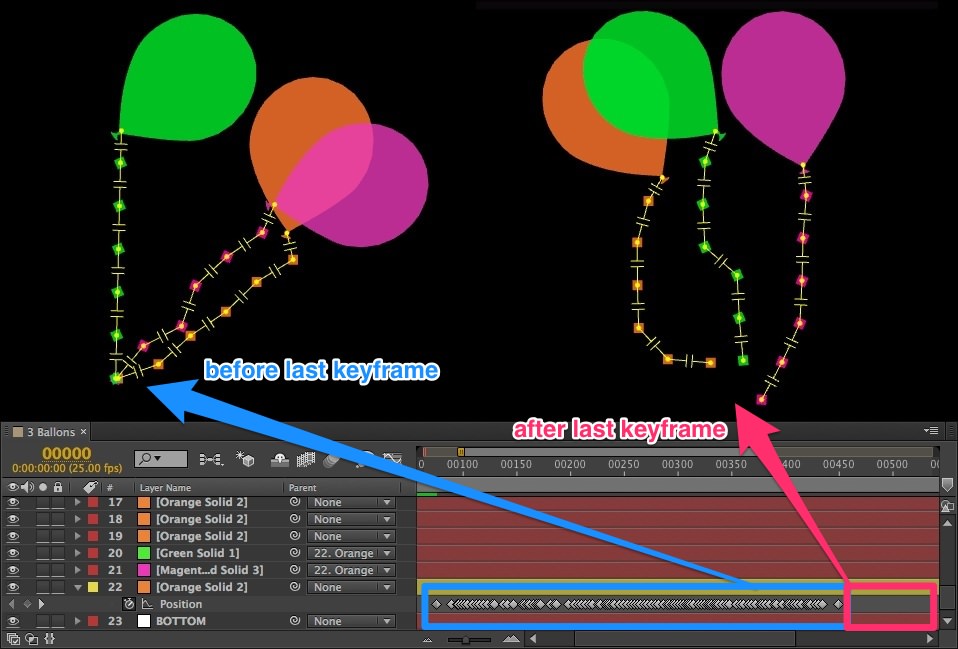
I’ve animated the hand graphics using AE’s Motion Sketch. I wanted the ropes to start from a unique point, but animated freely when the hand releases them. I’ve simply parented the start point of 2 ropes to the animated one. Then in Newton, I’ve chosen the Kinematic body type for all start points. At the end of keyframes animation, when bodies become dynamic, ropes move independently!
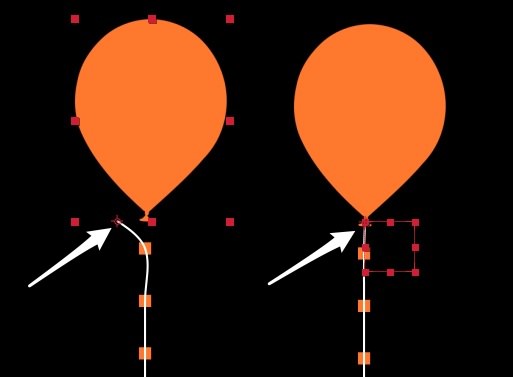
Creating the ropes was made easy by the use of the Rope feature of Connect Layers. You just need to select the reference objects, and hit Rope.
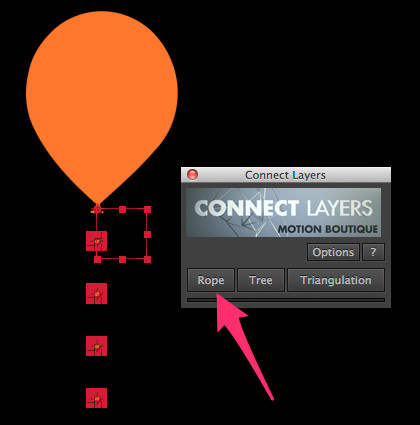
One common mistake is to forget to place the anchor point of your objects to the desire place, where the rope must pass through. You usually think about this after creating the keyframes in Newton. To solve this, create a null object, place it appropriately, and parent it to the reference object. Then choose the null instead of the reference object for creating the rope.
Some more experimentations on creating soft body using Newton2 and Connect Layers….
Inspired by the work of Lok Fu, we conducted some tests to create soft bodies using Connect Layers (for another technique that makes use of the puppet tool, see the tutorial from ‘Tercel’).
The final product:
music : Robgroove – Mashed up walking home in the dark // www.RobGroove.com
You can download the AEP (CS6 and above) and Newton2 settings file
[wpdm_file id=2]
The basic idea is to create the outline of the soft body with simple objects (e.g., box, circle), and connect them with soft joints.
Make sure that the anchor point of these objects are layer-centered.
We set up different joint rigs in Newton that create different behaviors for the soft bodies.
The first circle behaves like a bubble. We created a circular chain of distance and piston joints.
The second one resembles to a soft ball. We used a circular chain of pivot joints, and distance joints as spokes.
And don’t forget to rise the Sub-steps value in the Solver panel to produces a more accurate simulation!
Finally, the key is to activate the “closed” rope feature in Connect Layers.
Create soft bodies that react to a predefined animation using Newton2 and Connect Layers.
Motion Designer Lok Fu show us how he rigged the head and the neck of his horse using Newton2 and Connect Layers.
The final product:
Some animation tests:
02. Launch Newton, use the pivot joint to connect the body, neck and face (all the boxes). And tick the “Enable Limit” box, set the lower and upper angle to control the amplitude of those elements. Then tick out the same group from the “Collide With” box to make sure the boxes won’t affect each other.
01. First, animate the BODY (the boxes will follow the animated shape)
03. Turn the BODY to Kinematic to use the animation done in After Effects in step 1.
04. And let the neck and face Rock the world…
05. Finally simply just use Connect Layers to connect the boxes to create the smooth neck and the face.
The image above show how the horse reacted with the environment using Newton. But In the very beginning I just had no idea how to make the boxes looks smooth, then I’ve tried Connect Layers. The hair are done with Trapcode – Particular.
About the deformed circles.
The circles is created by a lot of little boxes, and all linked by the distance joint. The key is to set all the boxes anchor point at the same location, and set them as AEmatic bodies, so that they can be deformed by the horse because of the AEmatic tension. Also all the boxes will affect by each other via the distance joints to make the circle looks smooth. Finally use connect layers to connect all the boxes to create the circle outlook. The attached screen shot is the Newton setting, and you can see the testing result from the CNY14 testing animation (at 1″27).
“Let’s be amazing” (Newton2) breakdown by Resolution Media
A few month ago, Jason McFadyen from Resolution Media sent us an amazing animation that uses Newton2.
That Rube Goldberg machine at the end is pretty amazing so we asked them for some breakdown and they kindly reply.
1. We began by breaking the machine down into smaller sections and designed them using vector graphics, mostly in After Effects
2. Then to prepare for Newton, we dramatically simplified the composition, creating proxy version of the objects used in the animation.
This made it possible to for Newton to calculate our simulations in real time with no errors or glitches.
We also created new dummy objects that we hand animation, these wouldn’t be seen in the final composition but they helped ‘guide’ the physics simulation.
Ultimately we were creating a something that had to look good, not something that actually functioned, so a lot of little tweaks were made by hand that broke the laws of physics.
3. The project in Newton.
The vast majority of the animation and 100% of the ball animation was created by Newton simulations.
There was a lot of back and forth between After Effects and Newton to get the design right.
We found it very easy to ‘test’ a design in Newton, make modifications where needed and then re-test to see if it worked.
4. Once the simulation was exported from Newton we replaced all the proxy objects with the complex machine elements.
This was done by linking the complex objects to the proxy objects and then turning the proxy objects off.
The smaller sections were then all re-timed in the master composition so the animation would flow from one section to the next and time with the voice over.
5. We also found Newton extremely useful when animating cogs and pistons.
Constant motion of interlinking cogs is easy to animate in AE, but realistic acceleration from a standstill was almost impossible.
The same goes for animating a piston or any rigid body machine with a number of moving parts.
AE is just not set up for it.
We essentially used Newton as an Inverse Kinematics (IK) solver and our workflow was very similar to if we’d been using 3D software.
6. Once again we used proxy and dummy objects.
We found the ‘Star’ shape tool in AE very useful for creating proxy objects for the cogs that allowed for much tighter interlocking teeth.
We then set up links between in the piston and gave them limits just like an IK solution.
Note: We did not use a spring joint in out piston like the Newton tutorial, we had more moving parts and wanted more control.
Thanks to Stuart van Eysden & Jason McFadyen at Resolution Media
Here’s a great tutorial by Lloyd from aescripts that shows how to use Newton to create the physics simulation sections of the “Designed by Apple” spot created by Buck.
The very interesting part is that Lloyd use AEmatic body type to define a certain type of animation but with a kind of physics inside. Pretty cool. Thanks Lloyd!
Creates a single shape layer with a path connecting the selected layers (2D only). Use AutoBezier or Tension options to get rounded joint style.
Spanning Tree
Computes minimum spanning tree and draws each edge with a shape layer (2D and 3D support).
Triangulation
Triangulates the selected layers and draws each edge with a shape layer (2D and 3D support). If you want filled triangles (not just the edges), activate the Fill Triangles switch in the Options dialog. By default they will be filled with the same color, but you can also choose a source layer to colorize them.
Note that for functions that create shape keyframes (Triangulation with Filled Triangles turned on, and Rope), keyframing is done within the comp work area.
Quick start guide
USAGE
Compatibility: For AE CS6 or later
Current version:
1.08 – Initial release – May 2013
The Behemoth (developers of BattleBlock Theater for xbox 360) kindly post a very interesting article on how Derek Lieu used Motion Boutique Newton (version 1!!) in the cutscene of the game.
“To make anything that looked even close to this sort of simulation using only keyframe animation would’ve been laborious to say the least.”